I love love love the neon trend for Spring and can't wait to rock it through items I already own (pashmina, skirt and shoes) and maybe purchase a couple more. If you're a little apprehensive about neon, nail polish is a great way to ease your way into the trend.
I recently picked up two China Glaze nail polishes at Sally as they were on sale, two for $5. I've worn the pink a couple times but had yet to rock this neon yellow (Celtic Sun #1015), but after seeing the inspiration photo below, I knew exactly what I wanted to do!
To complete this look, after applying a clear base coat and letting it dry, I taped off my nails with Scotch tape on an angle. I painted two coats of the silver (Revlon's 'Silver Screen' #918) and left it to dry for a good 30 minutes. Then I peeled the tape off, gently, and very carefully coloured in the other part with the neon and it's regular brush. The edges aren't perfect (hello shaky hand) but still came out pretty great. I did two coats of the neon and my only qualm is that it's not the thickest solution (I found this with the pink too) and going over it many times with the brush creates almost 'bald patches'. I let it all dry for another 30 minutes and then did a top coat which smoothed out the whole thing.
The inspiration...
3 comments
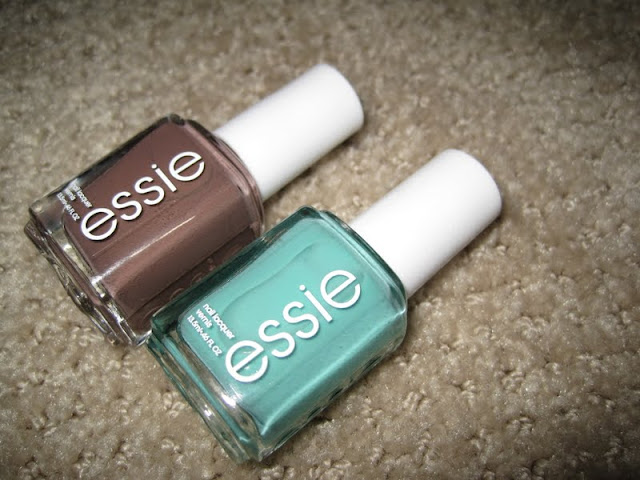
I'm a huge OPI fan. That's pretty much the only nail polish I will buy (because I've become a huge nail-polish-snob like that. Ugh.) However, since seeing Essie's Turquoise & Caicos on several bloggers last summer (I know, I'm so behind the times), I decided to take the plunge one year later.
I've never used Essie polish before and while it cost the same as my OPI normally does per bottle ($10), apparently I completely overpaid because the links above are much cheaper. Le sigh.
Onto the review! I find the T&C isn't a super thick formula, so while I did my standard two coats, three might have given a solid coverage (but then that's five coats with base adn top coat - far too much work for me). The Mink Muffs on the other hand (errr foot?) covered nice and opaque-ly with two coats. Normally I'm not a fan of thin brushes, but I find the Essie polish to be a bit more liquidy than OPI and thus a think brush is fine as it covers easily since it spreads well. The lasting power isn't bad, certainly comparable to OPI. As far as the shades go, I like their collections but find OPI has a bit more dimension to their colours.
Verdict: I'd buy it again, but still reach for OPI first.
Psssssst:

So I must admit I've been kind of crushing on neon colours lately... more specifically neon & grey. The combo is so fantastic and perfect for summer. The only problem? The only neon I own are nail polishes and while those are fun, they aren't exactly the neon-noticability (did I just make up a word?) I'm looking for. This is mainly the reason I resolved in April to make a skirt... a neon green skirt (okay, it's more like light lime with a hint of neon, but baby steps... baby steps)... which still isn't completed. Le sigh.
Hi Everyone! How stoked am I to be guest blogging for Amanda again! I am emily and I write emily loves. I wanted to share with you some products that make one of my biggest 'loves' easier! I paint my nails at least twice a week, it used to be more but now that I have a real grown up job I don't have the time to paint them every other night. Having naturally weak nails I have always been on the look out for products that will strengthen my nails. I had fake nails for a while but they were too much upkeep and not really my style. Next to making my nails stronger I wanted something to help the polish last longer and something else to make the polish dry faster. I'm not asking for too much, right?! After years of searching I have finally found my top three nail products. . . . lucky you, I'm going to tell you all about them!
This is my newest favourite colour 'Passion Pink'. Thanks to my fave three products I can rock this colour for days chip free!
I spent a full day driving around to different Ulta stores trying to find this product and it was totally worth it as it is by far the best base coat I have ever tried. The best part is it actually lives up to it's name! This stuff keeps my polish on longer than any other long-wearing base coat. Since it is clear (not green as it might seem) I just brush on a quick coat over clean nails. It doesn't need any dry time at all so once I have finished painting my second hand the first hand is dry enough for the next layer.
Salon Sciences Instant Artificials
This was a random Sally Beauty purchase during the summer and I can't believe that I've kept it a secret this long. I swear two coats of this product and my nails are as hard as gel nails. . . ok, maybe that is a slight exaggeration. For real though, this somehow dries to a super durable and hard finish, yet removes easily with polish remover. They recommend putting the coats right onto your bare nail, but I like to put it over the base coat. As someone who used to have flimsy nails this product is a life saver!
OPI RapiDry
I have used many different quick dry polishes and also the OPI DripDry drops and until I started using RapiDry DripDry had my vote. This spray is easy to apply (literally you just spray) and with 2-3 spritzes and 5 minutes your hands are good to go. This is the only product that actually dries to the point where you can do things. I always found that the other quick dry products would dry the polish to the touch, but not enough that you could actually do anything.
Let me know what your favourite nail products are!
Thanks for letting me ramble Amanda!
x em

Revlon 'Silver Screen' | OPI 'Shatter'
If you haven't heard of OPI 'Shatter', you might be living under a rock. This stuff is blowing up and it's awesome. I picked up a bottle about a week ago and it was perfect timing as my silver mani was starting to chip a bit. I touched up the tips and then applied the shatter and my nails were instantly 'done' again. T
his stuff is super cool, it starts to 'shatter' within 5 - 10 seconds (right before your eyes) and dries pretty quickly too (and you just apply one coat). The next day I had three compliments before lunch time (and one was from a guy).
It's going to be hard to resist putting this over every colour I paint my nails now. Husband even liked it so much he let me paint one of his toenails (shhh don't tell).
Yesterday while at Walmart I couldn't resist these two Revlon nail polishes. Now it should be known that I'm a bit of an OPI snob. Since starting to purchase the brand over two years ago, I've rarely bought anything else (except the odd Wet'N'Wild and Rimmel colours here and there). Now that's not to say I'm constantly buying nail polishes. Au contraire. At $10 a pop, I have to be selective of which colours I purchase because it's like a treat when I purchase one. All that to say, I bought these ones for $4 (we'll see how long they last).
When I buy nail polish, I always look at the brush. I like fat brushes (aka, less swipes per nail) and was immediately turned off by Revlon's thin brushes. However, I said to myself I shouldn't discriminate (haha) and decided to purchase. With freshly painted nails, I'd say the brushes aren't terrible, the formula goes on very smoothly and offers great coverage. I also found it dried a bit quicker than OPI. I did two coats, plus a base and top coat (Rimmel 60 second top coat). I love the pewter colour, and did my left ring finger in a more silvery colour. Know what I love even more? The price.
PS - Hand shots are soo awkward. Seriously. I'm like, 'Are those my hands? Ick.' Also, I'm definitely a nail biter but have been on-and-off letting my nails grow for the last year (I even had long nails at my wedding - and they were my own!). However, I've been stressed lately and in turn, ruined my nails. Bah humbug.
Sally Hansen nail polish remover, OPI Lincoln Park after Midnight (plum) & Don't Know Beets Me (pink),
Avon Nail Experts base coat & Rimmel 60-Second top coat (740 clear)
A few of you readers have commented on my nails always being painted and a friend recently reached out to me about my nail routine. I do always (prefer to) have my nails painted and typically give myself a manicure every Sunday (and a pedicure every three weeks or so - more often when summer rolls around, though). I love the look of painted nails and although it is high-maintenance, to me, it's worth it (and more cost-effective if I do it myself, although getting a manicure by a professional is always a lovely treat). I'm really terrible with biting my nails and picking at them and have been trying so hard to kick the habit (I've been good in some instances, but in others, old habits die hard) because they look way better when they have some length.
I've always painted my nails, even since I was a kid, I remember buying tons of Wet'n'Wild nail polishes, all colours of the rainbow. Now, I prefer OPI, however it is much pricier than drugstore brands, so I save so I can splurge on a new colour every so often to build my collection.
I really feel that the brush of a nail polish makes all the difference. You want something that has a wide brush, to minimized the number of strokes to completely cover each nail. I aim for two strokes per nail, but sometimes it's more. I find OPI's brushes are wide, the polish is smooth and it goes on very nicely. However, I have recently (re-)discovered Wet'n'Wild's newer line of nail polish, which I blogged about a few months ago. I don't find the polish lasts quite as long as OPI, but the brush and formula are excellent., and for $2 bucks a bottle, you can't really go wrong. Enough chatter, let's get started.
Start by removing all existing nail polish by using a cotton pad (do not wash your hands after this, the residue from the nail polish remover is actually beneficial to your manicure). I then use a cuticle stick to push back my cuticles, then I gently file my nails square with a stiff file.
I love this base coat, it goes on smooth, the brush is fairly wide and it dries quickly. A base coat is essential in preventing your nails from yellowing from the polish and to help the polish stick to something.
Next up, the polish. I like to do two coats of whatever colour I'm doing. You can see in the first picture it's the first coat (this should be a very thin coat, but completely cover your nail. Try to make it as smooth as possible, no bubbles, but perfection is not the goal here). The second coat (picture on right) is more important - you must ensure you cover the nail completely with quick strokes to minimize any air bubbles or bumps (don't worry about getting polish on your skin, we will take care of that after).
Let your nails completely dry before applying your top coat. This will ensure you don't smudge or remove any colour. Apply a thin layer of your top coat (I do like this top coat, but keep in mind that 'quick-drying' top coats aren't usually as good as non-quick-drying and may cause your nails to chip sooner (personally, I don't care, I'm in a rush all the time).
Once nails are dry, dip a Q-tip in nail polish remover and trace around the edges of your nails and cuticles to remove excess polish. If your nails are taking too long to dry, dip your fingertips in a bowl of ice water for as long as you can stand it. This will set the polish and you'll be ready to head out the door.
{ 'Red Tape' by Wet 'n' Wild }
I recently discovered Wet 'n' Wild's new 'Megalast' nail polish line and I have to say I'm quite impressed. Now, you know how much I love OPI, but at $10 a bottle, you better really love that nail colour. The secret though, is in the brush. I've tried to convert back to cheaper polishes, but, the brushes are so skimpy that the enamel doesn't go on smoothly, takes several swipes per nail, gets bubbly, etc. These ones from WNW have a super wide brush (just like OPI) and the polish isn't thick so it goes on nice and smooth (reminds me a bit of Zoya, which I also like). The only downside? This line only has about 20 colours. I know, perhaps you are thinking, 'What? Just 20 colours?!' in a sarcastic tone, but when you own most general colours (you know, dark red, bright pink, burgundy, dark pink, etc.) from OPI, the last thing you want to do is dish our more cash for the same colour. However, I'll take what I can get (for now) because at $2 bucks a bottle, it's a steal.
Hello everyone! I'm Kate from Fashion's Maven and am happy to be guest posting for A.Co while she is on her honeymoon with her new husband. Congratulations love birds!
Sephora by OPI has come out with their Fall 2010 collection, The Rocker Chic collection, and I think it looks amazing.
“My inspiration for the shades in this fall’s Sephora by OPI Rocker Chic collection is the iconic attitude that is pure rock. Defined by music—the empowered, impassioned, and addictive sound—Rocker Chic is tough and trendy, leather and lace. These shades translate that edgy vibe into fall’s must-have “neutrals with a twist”—statement-making browns, from sienna to chocolate-cherry Do I Know You?, Dating the Drummer, Studs & Stilettos, Rock His World; unapologetic metallics and iced blues Already Famous, Club Scene Queen, Go My Own Way; upfront red Fiercely Fabulous; and mysteriously dark wine Just a Little Dangerous.” -Suzi Weiss-Fischmann, Creator of OPI
Well, how can you not be inspired by that?! Here's a breakdown of the collection:
Just a Little Dangerous
I'm Already Famous
Fiercely Fabulous
Go My Own Way
Studs and Stilettos
Rock His World
Club Queen Scene
Do I Know You?
Dating the Drummer
Don't they all look amazing? So far I own Already Famous and Dating the Drummer but I can't wait to get my hands on some more!
Which ones are your favorite?
I used the nail polish I won in Katie's give-away over top of a fave Zoya colour I have and am very pleased with the results. I painted some opposing nails for fun. I normally don't wear sparkly nail polish (just don't have any) but used to love it when I was younger. It certainly brings me back and it's a great (nostalgic) feeling.
Zoya, 'Hope' / OPI for Sephora, 'It's Bouquet with Me'
* Want to be a guest blogger on A.Co est. 1984?
Subscribe to:
Comments (Atom)


