Last Friday my girl friends and I took the day off work (rendering us with an extra long weekend) and my bff hosted us at her place with her amazing pool. The weather was perfect (about 35 degrees C) and we spent the day lounging and swimming, gossiping and enjoying each others' company.
We decided to make it a potluck brunch to ensure we were fed, hydrated and happy. I brought that breakfast pizza I'm getting so good at making (and used tomato sauce on it this time; it's good!) and there was a ton of fruit, salads, dips and more. ...And of course several cold-cooler-spritzer-liquid beverage varieties.
I would love to share some photos with you:
Fun story: one of the girls uploaded the first photo of all of us to Facebook and we ended up getting a radio shout-out on the air! They even named us all, wishing us a great day. Cute!
2 comments
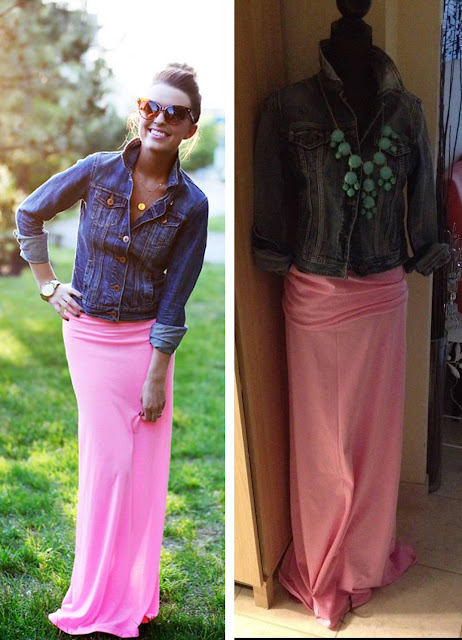
Sydney from The Daybook | My creation
Inspired by Sydney's look above (and realizing I couldn't order that exact skirt; too short for me), I pondered if I could make my own maxi skirt. Not a stranger to sewing (I've made a top, a dress, and a few other things), but certainly not a pro, I headed to my local fabric store in search of some pink jersey.
Jersey is an 'expensive' fabric, for what you're getting at least (c'mon, it's like t-shirt material), but it's my favourite fabric to work with as technically, you don't have to finish the edges as it will simply roll and never fray, it holds it's shape and (almost) never snags as you sew.
I found some pink jersey for $20/meter and asked one of the women working there to help me measure against myself. My specifics were simple: long enough for me and my 4-ish-inch heels with a folder over band. She cut me about 1.5 meters and it was the perfect amount.
I didn't document my steps extremely well, but follow the captions and it's actually quite simple. This took about two hours and I banged it out in one evening.

* Hold the fabric up length-wise at the store to ensure what you're cutting is long enough. For reference, I'm 5'11 and we did 1.5 meters.
* I laid out a maxi dress I own and traced the skirt portion, generously leaving an extra 5 inches or so on one side. I also started my tracing about 6 inches down from the top of my fabric (to account for the fold over waistband). I initially pinned it in a waved look, hoping it would cling to my butt better and flare out (like a fit 'n flare style) but learned that you can simply pin straight down.

* After sewing the fabric together to create a seam down the back of the skirt, I would try it on, discover it was too big, re-pin, sew, try on, etc. Keep doing this until you are satisfied with the fit.
* Then I sewed a 1 inch hem around the bottom.

* In the left shot you can see the additional fabric at the seam on the back (I'm wearing the skirt inside out). Once you are satisfied with the fit, you can cut this off.
* The right shot is a shot of the skirt head on, sewn hem and the fold-over waistband (which I did not finish with a seam, simply folded it and left the edge raw.
Voila!
Hello friends! I'm back from a weekend of pool parties and boating and am completely zonked. Sorry for the radio silence but yesterday was a holiday in Canada (hello Canada Day!) and I was off frolicking with friends in the 1000 Islands.
I will post more this week about how my extra-long weekend unfolded with all the pictures to share it.
Hope your weekends were wonderful.
I recorded this video back at the beginning of May but haven't had the chance to upload it. Since I tether my Internet connection with my iPhone, uploading videos to YouTube takes days. Seriously. So, the other day while at my sister's place, I used her wireless to upload this video and my thrifting haul. This one is a little late, but hey, better late than never, right? Happy weekend!
I ended up returning a few of the items shown in the video:
* The reversible orange/pink dress
* The black hi-low dress
I have been ogling the Isabel Marant's Gava heels for a while now but they aren't in the budget. I love the thick ankle strap and decided to make my own. Here's how I did it:
Supplies:
* Faux leather or vinyl (find this at your local craft/bead store or cut up an old flimsy belt)
* Velcro
* Scissors
Cut your faux leather as thick as you'd like. After cutting one, trace the other and cut.
Measure around your ankle to ensure the length is good.
Measure out your velcro pieces, just slightly less wide than your strap.
Attach the rough pieces of velcro to the outside of your leather.
Attach the fuzzy side to the underside.
Voila!
If you have straps already on your shoes, you could wear both together for a different look...
Or cut some suede cord and wrap it around...
Don't forget to try pairing your new leather ankle straps with various shoes...
Subscribe to:
Comments (Atom)


