


I have been ogling the Isabel Marant's Gava heels for a while now but they aren't in the budget. I love the thick ankle strap and decided to make my own. Here's how I did it:

Supplies:
* Faux leather or vinyl (find this at your local craft/bead store or cut up an old flimsy belt)
* Velcro
* Scissors

Cut your faux leather as thick as you'd like. After cutting one, trace the other and cut.

Measure around your ankle to ensure the length is good.
Measure out your velcro pieces, just slightly less wide than your strap.

Attach the rough pieces of velcro to the outside of your leather.
Attach the fuzzy side to the underside.
Voila!

If you have straps already on your shoes, you could wear both together for a different look...

Or cut some suede cord and wrap it around...

Don't forget to try pairing your new leather ankle straps with various shoes...


6 comments

After lusting after the Ann Taylor Elizabeth flats, I swore up and down that if I was able to find a pair of nude flats, I would recreate them myself (at a fraction of the cost).
Enter Ardene flats.
I was so ecstatic when I saw these puppies and when they had one pair in my size left, I almost squealed. Now it was just a matter of choosing between neon pink or yellow for the cap toes (both of which I had already).
Let's get started!
Supplies:
* Ardene flats $15
* China Glaze nail polish $5 (sale)
* Masking tape $1
* Paint brush $1


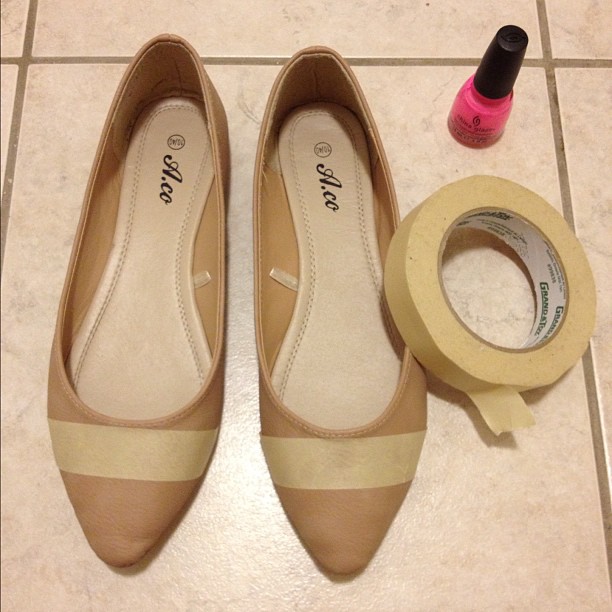
Tape off a cap-toe section. I eye-balled it but used the bottom of the stitch line around the toes to line up my masking tape so it would match both shoes.

Paint. Paint, paint, paint. Seriously. Neon nail polish isn't very opaque so it took me about 10 coats over the course of three evenings (that up there is about four coats). The good news is it dries very quickly so you can bang out several coats quickly. Another idea might be to use white nail polish first, as a base coat, and then the neon polish.
I ended up just pouring the nail polish onto the shoe, then spread it around with the brush.
I started using the nail polish brush, but it wasn't big enough. Unfortunately the big paint brush was leaving brush strokes, but that's okay for the first eight coats or so. When it started to be more opaque and was looking like I was getting close, I used the nail polish brush for the last two coats so there wouldn't be big brush strokes or patches.
Once finished, seal with a clear nail polish top coat. Before I did this, I put my shoes on, walked around and the cap-toe started to crack. In a panic I painted the clear nail polish on to seal it and it seems to have worked.

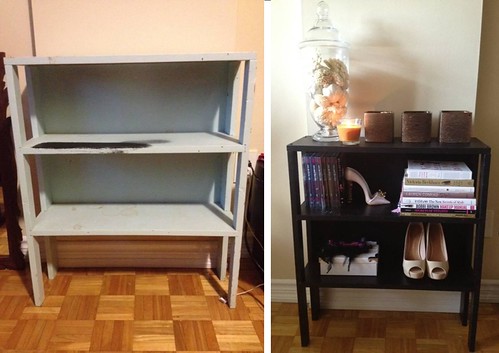
Before & After
As my grandparents prepare to sell their home, they are slowing cleaning it out. They have us family over frequently to go through things and pick out items we might like to have. There have been several trips over there and several scores made, thanks to their generosity.
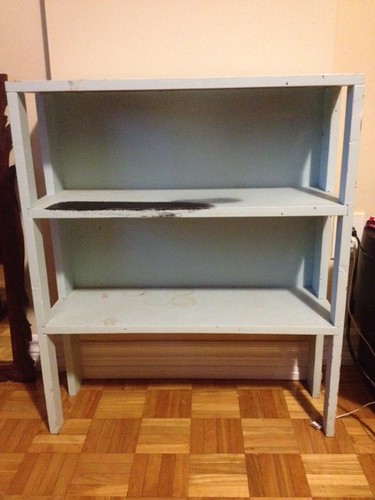
On my most recent visit, as I was looking around the basement, I saw this very old, powder blue book case that was housing stacks upon stacks of paper. I stood there staring at it, envisioning what it could be, but wondering if I would actually take the time to DIY it or if it would just be another, 'I'm going to do this-project' that gets put in storage (or a box!). I ultimately decided it would be a great storage solution for my small apartment and that I would make something of it.
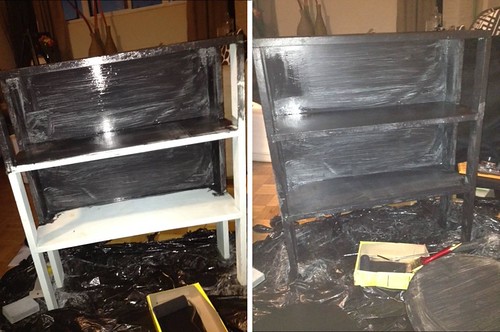
I asked my Poppa if I could take it home and he looked a little stunned. Pointing to the bookcase he said, 'This thing? You want this?' and I smiled and nodded. Turns out, my great-grandfather built it decades ago and it was handed down; making this piece even more covetable, family history. He emptied all the papers from it shelves, dusted it off and I managed to pack it into the trunk of my car. I got to work almost immediately sanding it down and painting black (a can of paint I already had) and after a couple coats and some touch-ups, she was ready for decorating!
I have to say I'm pretty pleased, the overall project took about three hours and the end result is so worth it. When I showed my grandparents the pictures you see here, they couldn't believe it and seemed quite pleased with my project; I certainly am.


I love love love the neon trend for Spring and can't wait to rock it through items I already own (pashmina, skirt and shoes) and maybe purchase a couple more. If you're a little apprehensive about neon, nail polish is a great way to ease your way into the trend.
I recently picked up two China Glaze nail polishes at Sally as they were on sale, two for $5. I've worn the pink a couple times but had yet to rock this neon yellow (Celtic Sun #1015), but after seeing the inspiration photo below, I knew exactly what I wanted to do!
To complete this look, after applying a clear base coat and letting it dry, I taped off my nails with Scotch tape on an angle. I painted two coats of the silver (Revlon's 'Silver Screen' #918) and left it to dry for a good 30 minutes. Then I peeled the tape off, gently, and very carefully coloured in the other part with the neon and it's regular brush. The edges aren't perfect (hello shaky hand) but still came out pretty great. I did two coats of the neon and my only qualm is that it's not the thickest solution (I found this with the pink too) and going over it many times with the brush creates almost 'bald patches'. I let it all dry for another 30 minutes and then did a top coat which smoothed out the whole thing.

The inspiration...


I have seen these 3D paper snowflakes around (mainly the office) and had no idea how they were made until my girl friend shared the recipe, er, simple how-to. I think these would be so pretty in various colours of paper and sizes.
I made the one above and hung it in my office (from the blinds). Next I plan to make several different sizes (likely all in white) and hang them from the ceiling in my front foyer to add some holiday cheer.
Someone pretty great taught me how to make an omelet... in the microwave! Perfect for a 'gourmet' breakfast at work (beats my bagel); it's quick, it's filling, it's healthy but most important, it's easy.
When my bestie asked me how I was making this omelet, I decided to snap some pictures of the process to share with her, then thought you lovely readers might like to see it too. Will you make this tomorrow morning at work?

1. Grab your ingredients (& be creative). I like broccoli (but substituted spinach & argula this time), grape tomatoes & cheese
2. Crack an egg...
3. ...or four (but only one yolk; keepin' it healthy)
4. Whiskkkk

5. Add your veggies...
6. ...and your chunks of cheese (I just rip the cheese apart) & stir it up
7. Into the microwave for 2 minutes and 22 seconds (just because I like punching only one number, multiple times)
8. And eat.

I love napkin rings and I find myself drawn to them everytime I go into Pier 1 (or any other store that sells them, for that matter), however, I really don't use them that often. Typically, just when we have guests for dinner because I'm not exactly breakin' 'em out for a dinner for two on a daily basis. However, they are nice to have for special or 'infrequent' occassions. I wanted to make my own, and these in fact were given as a housewarming gift to a friend. If you can't find any cheap napkin rings in store, I suggest checking out various thrift stores as they often have them for cheap. Let's get started.

What you need:
* napkin rings (I used six)
* burlap
* ribbon
* a stone or bead (something decorative)
* hot glue gun

* Measure out your burlap and cut it into strips about twice the width of the napkin ring and long enough that it will wrap around plus a little more
* Put a dab of hot glue on the napkin ring

* Press the end of the burlap strip into the hot glue
* Put a dab of hot glue inside the napking ring and press the burlap on the sides into it (they should overlap)
* Add a line of hot glue around the napkin ring and wrap the burlap around

* Put a dab of hot glue inside the napkin ring and fold the burlap inside towards the glue. Hold for a few seconds and you're done covering the napking ring (repeaton the remaining napkin rings)

* Cut out a piece of ribbon wide enough to wrap around one side of the napkin ring
* Put a dab of glue inside the napking ring (on the burlap) and wrap your ribbon around and hold

* To get even fancier, I used a second ribbon on top of the inital ribbon (just follow the steps above)

* Once the ribbon is attached, glue on your decorative stone or bead on top & you're done


Bon appetit!

After seeing Maegan's DIY for adding fur to your shoes (and boots), I immediately jumped in my car (okay, I showered first) and headed out on a mission to get some faux fur from Fabricland. Maegan used faux fur trim for hers, but unfortunately the only trim at my store was white and dark purple (which I contemplated, but passed up). I really wanted a tan coloured fur, or as a second resort black or grey. I left the fabric store feeling defeated but then remembered Walmart sold faux fur rugs. I took a chance and amongst the hot pink, lime green, black, white and dark grey there was (woohoo!) this tan colour. $20 for the rug makes it cheaper than buying faux fur by the meter at the fabric store ($38/m) too - score. Excited, I ran home and started cutting apart the rug and voila. Head to Meagan's blog to check out the full DIY.
 Aldo 'Rubin' (last seen here)


This closet clean out has not only been good for making space, I've reinvented a few things to fill in the missing blanks in my closets (score!).
Next up is a super easy sweater skirt. I got this idea when I first chopped up a striped tank to create a skirt (see the look) and then did it again a few days later (see the look). I'd never done it before and it worked out swimmingly... which has since prompted me to chop up other clothes I was planning on donating anyways (see, the perks of cleaning out your closet).
Next up is a super easy sweater skirt. I got this idea when I first chopped up a striped tank to create a skirt (see the look) and then did it again a few days later (see the look). I'd never done it before and it worked out swimmingly... which has since prompted me to chop up other clothes I was planning on donating anyways (see, the perks of cleaning out your closet).
This sweater skirt is super easy. Take a sweater you don't wear anymore (the longer, the better as it'll give you some length to the skirt. I did this with a shorter sweater and got a mini-skirt... not exactly the look I was going for, but then again, I'm 5'11 so many things end up being short on me) and cut it straight across underneath the arms. Generally (depending on the fabric) you won't need to finish the ends (especially if it's jersey or a thin-knit sweater like this. The ends will just roll a bit and it's perfect). Shimmy into the bottom tube piece, and voila, new (& free) skirt!

Yes, those are OTK boots with a peep-toe
PS - This is my 400th post! Wow!

I have been cleaning out my closets like crazy. The other night I went through my sweater closet and purged, purged, purged. Some items I will consign, but many will just be donated.
There are a few things I'm donating that I felt could be used for DIY (it's not like I have anything to lose if I'm donating it, right? Right). I decided to make some cute leg warmers with this old favourite sweater from Jacob. In the process, I made a vest too. It was super easy and if any of you give this a try, send me your photos and I'd love to see 'em!
What you'll need:
- An old sweater you don't wear anymore
- Scissors

Cut the sleeves off the sweater & voila
(I like the angle at one end as this looks cute on the feet when you wear them,
however, you could just chop 'em straight)

Dress 'em down with flats for weekend lounging (& wear the vest too!)

Dress 'em up with heels for a night out

Sally Hansen nail polish remover, OPI Lincoln Park after Midnight (plum) & Don't Know Beets Me (pink),
Avon Nail Experts base coat & Rimmel 60-Second top coat (740 clear)
A few of you readers have commented on my nails always being painted and a friend recently reached out to me about my nail routine. I do always (prefer to) have my nails painted and typically give myself a manicure every Sunday (and a pedicure every three weeks or so - more often when summer rolls around, though). I love the look of painted nails and although it is high-maintenance, to me, it's worth it (and more cost-effective if I do it myself, although getting a manicure by a professional is always a lovely treat). I'm really terrible with biting my nails and picking at them and have been trying so hard to kick the habit (I've been good in some instances, but in others, old habits die hard) because they look way better when they have some length.
I've always painted my nails, even since I was a kid, I remember buying tons of Wet'n'Wild nail polishes, all colours of the rainbow. Now, I prefer OPI, however it is much pricier than drugstore brands, so I save so I can splurge on a new colour every so often to build my collection.
I really feel that the brush of a nail polish makes all the difference. You want something that has a wide brush, to minimized the number of strokes to completely cover each nail. I aim for two strokes per nail, but sometimes it's more. I find OPI's brushes are wide, the polish is smooth and it goes on very nicely. However, I have recently (re-)discovered Wet'n'Wild's newer line of nail polish, which I blogged about a few months ago. I don't find the polish lasts quite as long as OPI, but the brush and formula are excellent., and for $2 bucks a bottle, you can't really go wrong. Enough chatter, let's get started.

Start by removing all existing nail polish by using a cotton pad (do not wash your hands after this, the residue from the nail polish remover is actually beneficial to your manicure). I then use a cuticle stick to push back my cuticles, then I gently file my nails square with a stiff file.

I love this base coat, it goes on smooth, the brush is fairly wide and it dries quickly. A base coat is essential in preventing your nails from yellowing from the polish and to help the polish stick to something.

Next up, the polish. I like to do two coats of whatever colour I'm doing. You can see in the first picture it's the first coat (this should be a very thin coat, but completely cover your nail. Try to make it as smooth as possible, no bubbles, but perfection is not the goal here). The second coat (picture on right) is more important - you must ensure you cover the nail completely with quick strokes to minimize any air bubbles or bumps (don't worry about getting polish on your skin, we will take care of that after).

Let your nails completely dry before applying your top coat. This will ensure you don't smudge or remove any colour. Apply a thin layer of your top coat (I do like this top coat, but keep in mind that 'quick-drying' top coats aren't usually as good as non-quick-drying and may cause your nails to chip sooner (personally, I don't care, I'm in a rush all the time).

Once nails are dry, dip a Q-tip in nail polish remover and trace around the edges of your nails and cuticles to remove excess polish. If your nails are taking too long to dry, dip your fingertips in a bowl of ice water for as long as you can stand it. This will set the polish and you'll be ready to head out the door.
Subscribe to:
Posts (Atom)